Wednesday, November 30, 2011

Light Bulb Snowmen

  Today, I'm sharing another craft of Christmas past. I cannot take credit for this idea, but I did help make these. Several years ago, my sister-in-love & mom-in-love saw or heard about this idea & decided to give it a try. Well, I would say that they very successfully pulled the idea off.

  The idea is to up-cycle used lightbulbs & make them into cute ornaments for your Christmas tree.


Here are the supplies used:
  • Light bulbs
  • FolkArt Clearcote Acrylic Sealer *See note below*
  • White paint
  • Felt
  • Pom-poms in different sizes
  • Googly eyes
  • Twine
  • Pipe cleaners
  • Mini teddy bears
  • Letter beads
  • Thread
  • Hot Glue
**Update: To view my step-by-step tutorial with step-by-step photos, click HERE.**


They started by painting the light bulbs ahead of time. ** Update: my sister in law told me I missed a step. "You need to add that we sprayed the lightbulbs before painting them...with FolkArt Clearcote Acrylic Sealer otherwise the paint just peels off." Thanks so much, Jodi!! **

Then, the fun began. This is where I came to help.


  • Cut strips of felt for the hats (or toques as we call them here in Canada) as well as the mittens. 
  • Attach twine to the hats & make a loop to hang the ornament
  • Add eyes
  • Add pom-poms for earmuffs, noses, & buttons. (You can also add them to the tips of the hat, as I did in the second picture on the blue hat)
  • Add a pipe cleaner around the base of the hat as in the second picture, if desired.
  • Attach mittens to twine & glue in place (leave some room loose at the front of the mitten for the next step)
  • Make them personal by adding a name or sentiment with the letter beads. String them onto some thread & glue the ends under the ends of the mittens.


Here's our little snowman/woman family:


  If you'd be interested in a more in-depth tutorial, leave me a comment & let me know. If there's interest, I can certainly whip up another one of these with some photo directions. Pictures would certainly help with the hat portion of the instructions as that can be hard to explain. 

  We bought a mini white Christmas tree for our family room this year. The kid's decorations (including these) & my nutcracker decorations grace its branches. We're lovin' it!

Enjoy your day!
Linkin' Up:

Tuesday, November 29, 2011

Christmas Fudge

  Christmas is the season of sweets. Cookies, cakes, pies, candies... and Fudge! 

  For as long as I can remember, I've loved fudge. I remember visiting The Fudgery in Banff, Alberta every summer & being able to choose my very own piece of sweet, gooey fudge from their vast selection of flavours. Another great part of the fudge shop was the big window they had in the front of their shop. You could stand outside & watch them make batch after batch of their amazing creations. 

  Several years ago, I found this super easy fudge recipe. It's a very versatile recipe - you can add whatever extras you want! Dried fruit, nuts, marshmallows, peanut butter, cookie pieces, candies... Let your imagination run wild! My kids love the marshmallow version so that's usually what I make.


Basic Chocolate Fudge
Makes about 2 lbs.

3 cups semi-sweet chocolate chips
1 can sweetened condensed milk
dash of salt
1-1/2 tsp. vanilla
2 Tbsp melted butter (if adding extras)

Over low heat, melt chips with sweetened condensed milk & salt. Remove from heat; stir in vanilla (and butter, if using). Fold in extras if desired. Spread evenly into wax paper lined 8 or 9 inch square pan. Chill 2 hours or until firm. Turn fudge onto cutting board, peel off paper & cut into squares. Store covered in refrigerator. Also freezes well.

Extras:
If you're putting in any extras, add 2 Tbsp melted butter to fudge mixture. Then fold in 2 cups of marshmallows, nuts, candies, cookie pieces, dried fruit, etc.

~~~

Enjoy your fudge creations!
Linkin' Up:

Monday, November 28, 2011

Spool Tree Ornaments

  Wow! Is it really less than a month until Christmas? Are you busy getting ready? I sure am! This weekend, it looked like my craft room threw up... I had so many things on the go. It was such a mess! I can't forget how blessed I am to even have a craft room to mess up... The last two houses we lived in, I didn't have that luxury.

  Here's one of the projects I was working on. Vintage spool tree ornaments. I found the vintage spools at a thrift shop this fall. I had pinned this idea on Pinterest & knew exactly what I was going to do with them. They turned out so pretty!


Supplies:
  • spools (vintage or new)
  • glitter
  • all-purpose white glue
  • sheet music or other paper
  • pearl beads
  • buttons
  • wire (I just used Christmas tree ornament hooks)
  • small wire working pliers 
  • hot glue

Instructions:
  1. Start by running a small bead of glue on the edges of the spools. Roll in glitter. Let dry.
  2. Cut strips of sheet music or other paper & adhere to the centre of the spools.
  3. Glue buttons to the bottom of the spool with hot glue.
  4. Shape your wire into curly-cues & add pearl beads. Add a twist on each end of the bead to keep it on the wire. Glue into top hole of the spool with hot glue. 
  5. Call your friends & brag to them about your pretty Christmas ornaments!


They look so nice & vintage-y on our Christmas tree. 


A set of these would also make a fabulous gift... especially for a seamstress or fellow crafter. :) 
I'm definitely going to keep my eyes peeled for more of these little goodies. 

I hope you're starting to enjoy the Christmas spirit & have had some time to start your preparations.

Enjoy your day!
Linkin' Up:

Friday, November 25, 2011

Christmas Blocks

  Today I'm featuring another craft of Christmases past. These blocks have been in our family for decades in one way or another. My brother & I played with them as children... seriously. They were just plain wood blocks back then though. When I was a teenager, I found them in a box of old toys & decided to make them into Christmas decor. I painted them in alternating red, green, & navy. Then I stencilled the letters for "Christmas" on them.

  After I was married & decided to go a little more contemporary with my Christmas colours, I repainted them silver & added rub-on letters to spell Christmas & with the one extra block I had I spelled "Merry" with sparkly little letter stickers.


  I've enjoyed these fun Christmas blocks so much over the years! This year, they're sitting on the bar top between our kitchen & dining area.


  If you'd like to make set of blocks like these, you'll need:
  • wood blocks
  • paint
  • letters (rub-ons, stickers, stencils, or stamps would all work)
I'm off to do some more decorating around here. My daughter & I did some more Christmas baking yesterday. Come back next week for another Christmas recipe & lots of other Christmasy things!

Enjoy your day!
Linkin' Up:

Thursday, November 24, 2011

Winter Banner

  I've started to decorate our home for Christmas at last. Thanks to all my fans on Facebook who's "likes" showed me that they had already decorated their homes for Christmas! It showed me that I was not too early by any stretch! I've been putting decorations up bit by bit & our Christmas tree will be going up this weekend.

  This being my first Christmas blogging, I thought I would share with you some of my Christmas crafts of the past as well as some of my collections & special decorations.

  Today, I will begin with a winter banner I made a couple of years ago.

Please excuse the plastic coated window! ;)

  I made it with chipboard shapes I purchased from Stampin' Up! I painted the snowflakes & stars silver or white, punched holes with my Big Bite & connected them with blue ribbon. So easy!


If you would like to make something similar, here's what you need:
  • Chipboard shapes
  • Paint
  • A heavy duty hole punch such as a Crop-o-dile or Big Bite
  • Ribbon


  And since it's wintery, not just Christmasy, we can enjoy it into January & February.

~~~

Happy Thanksgiving to all my American readers!

Enjoy your day!

Wednesday, November 23, 2011

Hanji Card Set

  This fall, I've had a very unique opportunity. A friend of mine who just recently moved to South Korea with her little family asked me if I would make a few sets of cards for her sisters-in-law & her mom for Christmas. She asked me if she could send me some handmade paper (called Hanji) from where she lives & requested that I made her mom's card set with these beautiful papers. I was ecstatic to say the least. When I received the tube of papers in the mail, they took my breath away. Whoever made these works of art is exactly that - an artist. If you look closely, you can see real leaves, blades of grass, & flower petals in some of them. The asian writing on the blue is another favourite. 


  I couldn't wait to start creating with them. But alas, I had other orders that came first. Finally, I was able to work with these papers last weekend. I used lots of earthy tones with touches of blues & rich pinks. Hanji is thin but surprisingly sturdy. It takes some doing to rip it. When you do rip it, it has a beautiful edge as you can see in some of the photos. I kept those edges on purpose. I think they add to the appeal.

  Here are my creations:


  I am loving the end result. I hope you do too. 

Enjoy your day!

Tuesday, November 22, 2011

Pretty Christmas Packages

  It's beginning to look a lot like Christmas, everywhere you go... The city workers were busily putting up the street Christmas decorations yesterday. Just seeing them go up & knowing that Christmas is getting ever closer makes me so happy.

  My Christmas shopping is getting closer & closer to being done. With me bringing gifts into our home, I'm coming up with hiding places for them as well as imagining pretty & creative ways of wrapping them. Wrapping gifts is seriously one of my favourite parts of Christmas. As usual, I've found lots of inspiring ideas on Pinterest. (A blogger's best friend!) :)

  Here are some of my favourites.

  I've found lots of packages wrapped in sheet music with touches of other elements added in. Silver or solid coloured paper with pinecones, ornaments, & hand made flowers add the beautiful details that make a gift so attractive. (All gift images via Pinterest. Specifically, these are collected in my Christmastime Is Here board)

  This grouping of brown paper packages has me humming "My Favourite Things"! I love all the different ways you can personalize brown packing paper! I especially thought the idea of sewing a gift into paper cut in festive shapes (3rd photo in) was super creative. 

  Lace doilies are easily found in thrift stores usually by the bag full. What a great way to upcycle them - on a pretty package wrapped with ribbon!

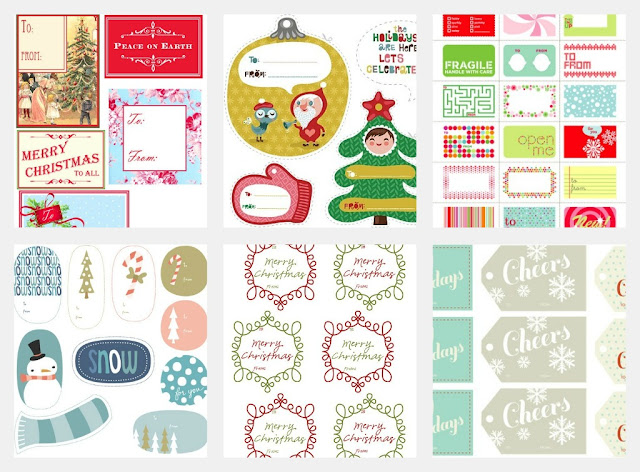
  And once your package is wrapped, don't forget about the tags! You can make you own, buy them, or there are many, many free printable ones you can download & print off at home. There are so many cute graphics out there. You can find anything to suit your colours or taste. (These printable images are collected in my Fonts & Printables board.)


   Are you feeling inspired? I sure am!! I am itching to put on a Christmas movie (maybe White Christmas or Holiday Inn - I love a good musical!) & wrap presents to my heart's content. 

 I'm curious. Do you wrap your gifts as you buy them? Or do you wait until the last minute & wrap them all on Christmas Eve? Do you wrap them & hide them or put them under the tree? 

  Every family is different. I enjoy hearing about the differences in people's traditions. Even the seemingly unnoticed traditions like wrapping gifts as you go or staying up late on Christmas Eve wrapping them so that your kids will think they're from Santa on Christmas morning. 

  Ooooo! Christmastime is here!

Enjoy your day!
Linkin' Up:


Monday, November 21, 2011

Merry Berry Cheese Bars

  So far, my Christmas baking is going well. Two recipes down, a few more to go. Today, I'm going to share a favourite recipe that I've been making all of my married life - 11 years now. 


If you like cheesecake or cranberries, then you'll enjoy these! This recipe originally came from Eagle Brand.

Merry Berry Cheese Bars a.k.a. Cranberry Cheesecake Bars
makes 24-36 bars


crust:
2 cups unsifted flour
1 1/2 cups oats
3/4 cup firmly packed brown sugar
1 cup butter or margarine, softened

cream cheese layer:
1 (8 oz.) package cream cheese, softened
1 can sweetened condensed milk
1/4 cup lemon juice

berry layer:
1 can cranberry sauce (you can use whole berry, but I prefer jellied)
2 Tbsp. corn starch
1 Tbsp. firmly packed brown sugar

Preheat oven to 350°.

1) With mixer, beat flour, oats, 3/4 cup sugar & butter until crumbly. Set aside 1 1/2 cups of the mixture. Press remaining mixture on bottom of greased 13x9 inch baking pan. Bake for 15 minutes or until lightly browned.

2) With mixer, beat cream cheese until fluffy. Gradually beat in sweetened condensed milk until smooth, stir in lemon juice. Spread over baked crust.

3) Combine cranberry sauce, corn starch, & 1 Tbsp. brown sugar. Spoon over cheese layer. Top with remaining crumb mixture.

4) Bake 45 minutes or until golden. Cool & cut into bars. Refrigerate leftovers.

~~~

I hope your family enjoys these as much as we do!

Enjoy your Monday!
Linkin' Up:

Thursday, November 17, 2011

'Tis the Season for... Peppermint

  Christmas is drawing ever closer. Thankfully, I got a bit more of my Christmas shopping done yesterday. One step closer to being done. I personally like being done with gift buying by the time December rolls around. Then I can focus on wrapping, decorating, baking, cooking, & having fun with my family & friends.

  One of my favourite flavours of Christmas is peppermint. I've found a wonderful collection of Christmas goodies featuring peppermint on Pinterest. I'm planning on making some (not all!) of these goodies this Christmas season. I am having a hard time deciding on which ones though. Any votes for your favourites?

Frozen Peppermint Cheesecake

Peppermint Crunch Chocolate Chip Cookies


Peppermint Sugar Cookies


Candy Cane Kiss Cookies


Peppermint Meltaways 


Peppermint Mocha Cupcakes


Hot Chocolate Cupcakes


Peppermint Profiteroles


All photos via Pinterest. 

So, what are your votes? Are you feeling inspired to make any of these for your family? I have the Peppermint Meltaways on my list to make this week.

Have a great weekend!
Linkin' Up:

Wednesday, November 16, 2011

Pinterest Recipe Reviews Pt. 2

  How's your week been so far? Here in Saskatchewan we are trying to stay warm... cuz baby, it's cold outside! I'm trying to keep things cozy in our little nest. Christmas tunes are playing (click here to hear our new favourite album) & I've been doing some Christmas prep. We're starting to feel the Christmas spirit & I, for one, love it!

  Several weeks ago, I did my meal planning via Pinterest. Well, I'm here to finish off the reviews on that group of recipes. (Here is part one if you missed it.)


  This was an amazing chicken dish! SOOOOOO tasty! The only thing I did differently was I used skinless chicken breasts instead of skin on. If you're a fan of lemon, you will love this as much as we did. I will definitely be making these again.


  Okay, this recipe wasn't on my original meal plan, but I was going to a girl friend gathering & had to bring something. ;) These cookies are crazy good! If you enjoy sweet & salty together, you will certainly enjoy these bundles of yumminess. In Canada, we sadly don't have the caramel pieces she lists in the ingredients so I used butterscotch chips instead. I think they were a pretty great substitute. I will be making these again.


  My kids helped me make these for supper one evening. They are easy & tasty. One note: do not mix in the salt with the eggs like it says to. It all settled to the bottom & most of the salt ended up in one of the frittatas. Yup, I got that one. Yech! But the rest were very good. I would just sprinkle some salt into each cup next time. I'll make them again.

  So now that I've finally made most of what was on that original meal plan, I'm off to do another one! A family's gotta' eat, after all. Might as well make it good.

Enjoy your day!

Blogging tips