Wednesday, July 11, 2012

DIY Doily Gift Bag

I'm back again today with another gift wrap idea. Seriously, this is turning into a series. :)

This is another way to pretty up a plain coloured gift bag.


Here's what you need:
  • Gift bag
  • Paper doilies
  • A stapler
  • Glue Dots, double sided tape, or hot glue
I followed this tutorial to make the large doily flower on the front of the bag. 


Then, I attached it to the bag with the Glue Dots.


To make the doily ruffle at the top of the bag, I followed these steps:


  1. Cut a paper doily in half & accordion fold it.
  2. Gather the bottom edges together to make a little fan.
  3. Squish the edges together & staple.
  4. Adhere to the inside of the gift bag in a row with glue dots, double sided tape, or a hot glue gun.
  5. Repeat on the other side.


Cuteness!


Wouldn't you like to receive a gift in a bag like this? 

Who knows, maybe I'll give it to you! ;)

Thanks for reading. If you like what you see here on Silver Boxes, I'd love it if you would become a follower, 
subscribe by email (sign up on the right sidebar), or follow along on FacebookPinterest, or Twitter
And please leave a comment when you do so I know who my new friends are! :)


Enjoy your day!


This project was featured on:

Tuesday, July 10, 2012

Piña Colada Pops


"Hot enough for you?" 

How many times have you heard that recently? 

I know many of my friends in the States are experiencing very hot weather. 
(We can't wait to join you all in the States for our Disneyland vacation soon. Only 12 more days!)

And at last we are experiencing hot weather in Saskatchewan. Summer is finally here.

We enjoy sitting outside in the yard with a frozen treat after supper on these hot summer days. The treat I have for you today is perfect for just such an occasion & is family friendly (non alcoholic). 


I've created another frozen pop recipe to help you take the edge off of the heat. 

Piña Colada Pops {Print Recipe}
makes about 7 Dixie cup sized pops

1/2 of a fresh pineapple, peeled, cored & chopped
1/2 cup pineapple juice
1 cup coconut milk (I had unsweetened on hand so that's what I used)
1/4 cup flaked coconut
1/4 cup sugar

Place all ingredients in the blender & puree until smooth.

Pour liquid into Dixie cups & freeze until solid.

Super easy & yummy!

~~~~~

Thanks for reading. If you like what you see here on Silver Boxes, I'd love it if you would become a follower, 
subscribe by email (sign up on the right sidebar), or follow along on FacebookPinterest, or Twitter
And please leave a comment when you do so I know who my new friends are! :)


Stay cool & enjoy your day!


This recipe was featured on:

Monday, July 09, 2012

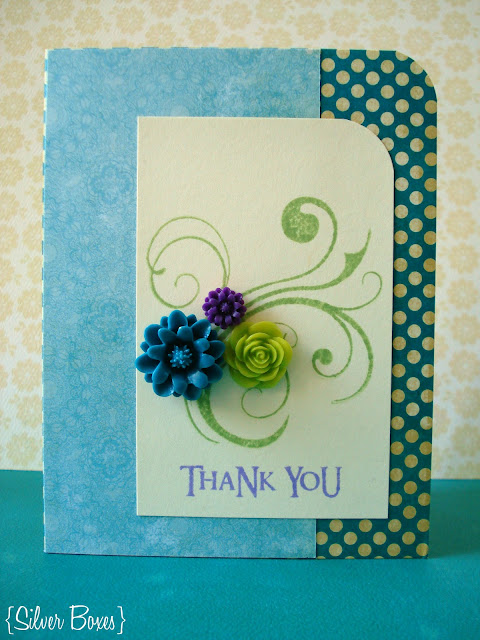
Resin Flower Thank You Card


  Don't you love getting real mail? I mean going to the mailbox, reaching in & not just extracting bills & junk mail, but finding an actual card or letter from a friend or beloved family member? I get a little thrill every time we receive mail with a hand written address on the envelope. It gives me a little reminder of when I was a kid & I would collect the mail from our P.O. box in the small town where we lived. Every once in a while I would get a piece of mail! What a thrill that was... and still is! 

  I think when I make my cards it's my way of sharing that feeling with my friends & family. I try very hard to send out thank you cards for gifts & kind deeds, even if just to bring a smile to someone's face. 

  Here's my most recent Thank you card creation...


Products used:

(Click on thumbnails to see sources)


I hope I've inspired you to share some love with a friend or family member. 
Don't always rely on email... receiving some good, old fashioned snail mail is still alot of fun!


Thanks for reading. If you like what you see here on Silver Boxes, I'd love it if you would become a follower, 
subscribe by email (sign up on the right sidebar), or follow along on FacebookPinterest, or Twitter
And please leave a comment when you do so I know who my new friends are! :)

Have a wonderful day!


Friday, July 06, 2012

Don't Hide Layout {My Mind's Eye}


  As I mentioned on Monday, last weekend my daughter & I had the house to ourselves & we did quite a bit of crafting. This is one of the layouts I was able to complete. 

  I used mostly My Mind's Eye products from the Stella & Rose line.


You may be interested to know that the photo I used for this layout was from a trip to the farmer's market last fall.

To add a bit of extra bling to the page, I layered the crystal on top of the chipboard button on top of the letter "o" in "don't". It helps create a visual triangle. Not sure what I mean? Check out the whole layout above. See the 3 places I used crystals in the layout? They form a visual triangle which is pleasing to the eye.


This "So Happy" sticker is pre-made so all the work is done for you! Just peel & stick!


Complete product list for this layout: 

(Click on thumbnails to see sources)

InLinkz.com

Thanks for reading. If you like what you see here on Silver Boxes, I'd love it if you would become a follower, 
subscribe by email (sign up on the right sidebar), or follow along on FacebookPinterest, or Twitter
And please leave a comment when you do so I know who my new friends are! :)


Have a great weekend!

Thursday, July 05, 2012

An Old Friend Gets A Makeover

  
  Years ago, when my grandpa was moving into an assisted living home, he had an auction to sell off his & my granny's estate. We, as a family spent the day at the auction, helping out. My parent's told my brother & I to let them know if there was anything of our grandparent's that we really wanted. As a teenager, I didn't always speak up & let my thoughts be known. (In fact, I'm still learning to speak my mind.) Anyway, that whole day I had my eye on this mustard coloured stool. I loved the retro look. It reminded me of playing pool in my grandparent's basement because that's where it's home was. But... I didn't tell my parents

  Most of the day went by & finally this stool came up for bid. Because I hadn't said anything to my parents about my desire to have it, someone else bought it. I was kinda bummed & finally mentioned it to my parents that I really wished I could have had that stool. 

  My parents were so nice about it & didn't give me a hard time. They went to the people who had just bought it & explained that that stool was the one thing that this man's grand daughter really wanted. The people were very understanding & accepted what they had paid for it in return. 

  I got grandpa's stool after all! And learned a lesson in speaking up...

  After years of use & after our two kids came along, the stool had seen better days. But alas, the stool holds a lot of  sentimental value for me. I was not willing to let it go. (Which is saying a lot for me. I rarely have a hard time getting rid of things.)


 Finally, last month my mom (who happens to be an interior decorator - I know: Score! Love you mom!) & I took the stool & went in search of an upholstery shop. We found a great place that specializes in boat upholstery & therefore had a ton of vinyl to choose from. 

  I chose a dark grey with a bit of veining to make it look more like leather. I took the legs off before hand & spray painted them a glossy black.


My old friend looks new again & we are enjoying the new look so much!! I wish I could say I upholstered it myself, but since I've never upholstered in my life, I wasn't willing to practice on such a special piece. 
I left it to the professionals. 


I love it!!

Enjoy your day!


This project was featured on:


Blogging tips