Showing posts with label Tutorials. Show all posts

Wednesday, April 17, 2013

Diaper Box Upcycle Tutorial


Hello, friends!

Today I have an extra special treat for you... my beautiful friend, Darlene, is going to share with you how she made these fun "baskets" for her baby's change table. 

Aren't they super fun?


Darlene & I have been friends for many years - since our college days! 
She is a SAHM to her 3 adorable children. She makes divine bath & body products. 
(Her bath bombs are the BEST!)


In the last year or so, I've started to see Darlene share some of her other creations & home decor on Facebook. I asked her if she would like to share a project with my readers & I'm thrilled she said yes!

She's put together a fabulous tutorial on how to upcycle diaper boxes into storage baskets!

Enjoy!

Friday, February 22, 2013

DIY Pennant Gift Bag


Today I'm showing you an easy way to dress up a plain gift bag.

Pennants/bunting/banners are all the rage right now & this is such a simple little project you can do in such a short time.


Here's what you need:

Wednesday, July 11, 2012

DIY Doily Gift Bag

I'm back again today with another gift wrap idea. Seriously, this is turning into a series. :)

This is another way to pretty up a plain coloured gift bag.


Here's what you need:
  • Gift bag
  • Paper doilies
  • A stapler
  • Glue Dots, double sided tape, or hot glue
I followed this tutorial to make the large doily flower on the front of the bag. 


Then, I attached it to the bag with the Glue Dots.


To make the doily ruffle at the top of the bag, I followed these steps:


  1. Cut a paper doily in half & accordion fold it.
  2. Gather the bottom edges together to make a little fan.
  3. Squish the edges together & staple.
  4. Adhere to the inside of the gift bag in a row with glue dots, double sided tape, or a hot glue gun.
  5. Repeat on the other side.


Cuteness!


Wouldn't you like to receive a gift in a bag like this? 

Who knows, maybe I'll give it to you! ;)

Thanks for reading. If you like what you see here on Silver Boxes, I'd love it if you would become a follower, 
subscribe by email (sign up on the right sidebar), or follow along on FacebookPinterest, or Twitter
And please leave a comment when you do so I know who my new friends are! :)


Enjoy your day!


This project was featured on:

Friday, June 08, 2012

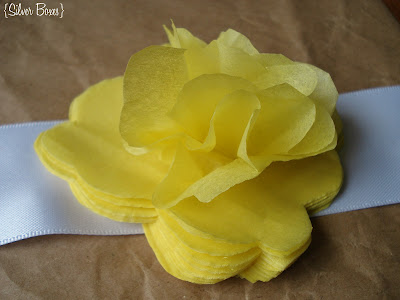
Tissue Paper Flowers to Embellish a Gift Package

Don't you think that a beautifully wrapped package adds to the thoughtfulness of a gift? 
I sure feel that way & love when people put in a bit of extra effort to add some beauty to a gift's packaging.


This is such a cute little gift embellishment that easy to make yourself. I just learned how to make the tissue paper flowers from Michael Ann Made & simply took them a couple of steps further. 

Supplies Needed:
  • Wrapped gift
  • Wide ribbon or strip of paper
  • 3 Sheets of tissue paper
  • Scissors
  • Hot Glue Gun


Starting with your wrapped gift (I just recycled some brown paper), lay a length of wide ribbon across the gift. 
You'll need enough to wrap around the gift & glue to the ends together.


For the tissue paper flowers, you start with a sheet of tissue paper. Obvious much? ;)
Fold it into a square to whatever size flower you want.

This is where I differed slightly from the original tutorial. I used a full sheet folded up with makes quite a full flower - it looks much like a peony, in fact.


Cut out flower.


Once your flowers are cut out (I did 3 - one pink & 2 yellow), place them on the ribbon.


One you have them placed the way you want, staple them to the ribbon.


Starting with the top layer or two of tissue, bring it up & gently pinch it together.


Working by layer (or two), pinch all the layers. 


There you have it! Your flower is finished!


Now hot glue the ribbon together at the bottom of the gift.


Done! Give your super cute gift with pride in a job well done.


Have a wonderful weekend!


This project was featured on:


five days five ways  feature friday free for all

Tuesday, March 06, 2012

Nut Jar Upcycle

Can you guess this little container's humble beginnings? 
Well, you likely already have because of the name of this post. :)


But in case you skimmed over that part & really are wondering, it all started with a little almond jar like this.


After we ate the yummy almonds, I kept the little jar thinking it was a great size. But what to do with it???

I finally just started playing, not really having the whole vision when I started. 


Here's what I did:

1. Paint the lid black with craft paint.

2. Cut some patterned scrapbook paper to fit the jar. 

3. Apply the paper with Mod Podge.

4, 5, 6. One by one, layer the tabs on the bottom of the jar, using Mod Podge on top of each one. 


7. Apply a layer of Mod Podge over the entire paper surface. Let dry.

8. I learned how to make rolled paper flowers using this tutorial. I made 3 bigger ones & 3 smaller ones. Apply with hot glue. 


Now to figure out what to do with it now that it's all prettied up... any ideas? 


I'm thinking it would be great as gift packaging with a sweet little gift inside (maybe jewelry?).


Please share your ideas as to what you think I should do with it! :)

Enjoy your day!
I link up to these great parties

This project featured on:


Monday, February 27, 2012

Girly Rag Wreath (a.k.a. The Never Ending Project)

  Have you ever started a project thinking it would be pretty straightforward & relatively easy only to be proven so wrong? This wreath was that project for me. 

  Before Valentine's Day, I was going through my craft cache, determined to use up some of the supplies I had on hand before purchasing anything new. I had several fat quarters of fabric that I bought a couple years ago thinking I would make some fabric flowers & scrapbooking embellishments. I did make a few, but had lots of fabric left over... especially a lot of pink. Great for a Valentine's project, right?

  After seeing some pretty rag wreaths on Etsy, I figured I could make one fairly easily. 

  Easy? Yes. 

  Fast? No!

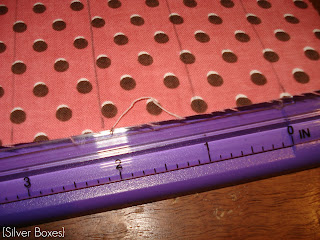
  A disclaimer: If I had a rotary fabric cutter & mat, that would have made a massive difference. Alas, I cut all these fabric strips with my craft scissors. I would definitely recommend using a rotary cutter.


Now, on to the tutorial. 

Supplies:

4 & 1/2 fat quarters of fabric
wire hanger

Tools:

Pliers
Ruler
Scissors or rotary cutter & mat

I used a wire coat hanger as the round form. Take the hanger & bend it into a circle. 


Using a pair of wire cutting pliers (lineman pliers, according to my husband), cut off the hook.


Form wire into a connecting hook.


Cut fabric into one inch wide strips, into a few different lengths. I did 4, 5, & 6 inches.


I wanted the fabric to have frayed edges, so after it was cut I washed it in the washing machine to achieve that. Then it needed to be ironed & the loose threads cut off. This took a few hours.  


At last! Ready to make the wreath. 


Start tying, alternating the fabrics & lengths. I just had my fabrics stacked randomly by pattern, as you can see in the photo above.


Finished! Ta-da!


I have it happily displayed in my craft room.


I love it even though it took so long to make.


Thanks for reading!

Enjoy your day!
Check out the great parties I link up to!

This project was featured at:


Blogging tips