Showing posts with label cards. Show all posts

Friday, November 22, 2013

Five Days of Handmade Christmas Cards - Day Five: Felt!


Thanks for joining me for the fifth day of our series!

Five Days of Handmade Christmas Cards


Here's a super simple way to use felt on your handmade cards.


These felt wreaths from Stampin' Up! make Christmas cards very, very easy!
I simply tied a little bit of baker's twine around it in a bow, then adhered the wreath to the card with glue dots.


Products used:

Cardstock: Stampin' Up!
Felt wreath: Stampin' Up!
Baker's Twine: My Mind's Eye
Sparkly Letters: Making Memories
Red Jewels

Thanks so much for joining me for this series. 
I hope you have a great time in your Christmas preparations!

Thanks for reading. If you like what you see here on Silver Boxes, I'd love it if you would become a follower on Google Friend Connect, subscribe by email (sign up on the right sidebar), 
or follow along on FacebookPinterestInstagram, or Twitter
And please leave a comment when you do so I know who my new friends are! :)


Enjoy Your Day!


Thursday, November 21, 2013

Five Days of Handmade Christmas Cards - Day Four: Twine!

Welcome to day four of...

Five Days of Handmade Christmas Cards!


For those of you who are just joining me, you can find day one, two, & three HERE, HERE, & HERE.

Today I'm showing you a simple way to use twine on your handmade cards.


Do you ever finish making a card & sit back, thinking, "It needs something else"? 
Often, that elusive "something else" is a bit of texture or something that adds dimension. 
Ribbons, buttons, gems, & twine can all add that little finishing touch.

For this card, I finished everything & simply wrapped the twine around the card a couple of times before tying it into a knot. 

Simple & easy! (You know me - that's my motto!)


Products used:

Cardstock - Michael's
Patterned Paper - Echo Park
Happy Holidays greeting - Echo Park
Scallop punch - Stampin' Up!
Ribbon - My Mind's Eye
Twine - bought at Walmart 


Thanks for joining me these past few days. Tomorrow we finish the week off talking about using felt accents on your Christmas cards. I hope you'll join me!

~~~~~

Thanks for reading. If you like what you see here on Silver Boxes, I'd love it if you would become a follower on Google Friend Connect, subscribe by email (sign up on the right sidebar), 
or follow along on FacebookPinterestInstagram, or Twitter
And please leave a comment when you do so I know who my new friends are! :)


Enjoy Your Day!


Wednesday, November 20, 2013

Five Days of Handmade Christmas Cards - Day Three: Washi Tape!

It's day three of...

Five Days of Handmade Christmas Cards!


If you missed day one & two, click HERE & HERE.

Washi tape has got to be one of my favourite craft supplies ever! It's just to fun to use on all kinds of things!


  For this card, I started out by trimming the white card stock to layer on to the blue card base. Then I made sure the top & bottom lines of wash tape were straight. After that, I crisscrossed the rest.  The main reason I wanted the top line to be straight to make it easier to line up my stamp for the greeting! ;)


Products used:
Card stock: Stampin' Up!
Washi Tape: Martha Stewart crafts
Stamp: My Mind's Eye
Buttons
Embroidery floss

The simplicity & fun colours of this card are what I like most.

I hope you have some fun with washi tape on your handmade Christmas cards!

~~~~~

Thanks for reading. If you like what you see here on Silver Boxes, I'd love it if you would become a follower on Google Friend Connect, subscribe by email (sign up on the right sidebar), 
or follow along on FacebookPinterestInstagram, or Twitter
And please leave a comment when you do so I know who my new friends are! :)


Enjoy Your Day!


Tuesday, November 19, 2013

Five Days of Handmade Christmas Cards - Day Two: Cork!


Welcome to the second day of...

Five Days of Handmade Christmas Cards!


If you missed yesterday's post, check out day one - Glitter - HERE!

Today, we talk about

Cork!

Cork isn't something that's used a lot in card making, but because of that, using it adds an element of surprise & charm.


To make the cork tree, I found a template online, cut it out & traced it onto the sheet of cork. Then I simply cut out the tree shape. The sheet of cork I used had adhesive backing on it already.

Adding some adhesive backed gems & a button to the top makes it look even more Christmasy!


Products used:
Cardstock - Michael's
Doily - Dollar store
Cork sheet - Michael's
Gems - Michael's
Button - Unknown
Baker's Twine - My Mind's Eye
Christmas Wishes Rub-on - Stampin' Up!
Stitching with sewing machine


The cork adds an element of nature to the card. I love the woodsy feel!

Make sure you come back tomorrow for Washi Tape!

~~~~~

Thanks for reading. If you like what you see here on Silver Boxes, I'd love it if you would become a follower on Google Friend Connect, subscribe by email (sign up on the right sidebar), 
or follow along on FacebookPinterestInstagram, or Twitter
And please leave a comment when you do so I know who my new friends are! :)


Enjoy Your Day!


Monday, November 18, 2013

Five Days of Handmade Christmas Cards - Day One: Glitter!


Christmas is coming on fast! 

I'm feeling the need to start preparation as of yesterday. What about you?

I know those of you who make handmade Christmas cards have perhaps begun already or maybe are already finished. However, lots of us are still working on it! 

Whichever category you're in, I hope you will come back to be inspired every day this week.

Because....

I have a new series for you:

Five Days of Handmade Christmas Cards!


Like the song, 'The 12 Days of Christmas' I wanted to showcase the use of a specific craft supply with each day's card. 

Here's the rundown:
Monday: Glitter
Tuesday: Cork
Wednesday: Washi Tape
Thursday: Twine
Friday: Felt

So today we begin with

Glitter!


We all know that glitter can be the messiest craft supply out there, but it also packs such a punch to almost any craft project. 

So, wanting to keep the mess to a minimum, I used pre-glittered products to this card: patterned paper & ribbon.

No muss or fuss! It also cut down on the time taken to make the card - that's definitely a plus!


Products used:
Cardstock - Michael's & Stampin' Up!
Patterned Paper - Striped glitter - My Mind's Eye, Sheet music - unknown
Gold Shimmer Vellum - unknown
Ribbon - My Mind's Eye
Merry Christmas Rub-on - Stampin' Up!
Ink - Stampin' Up!


Let Christmas preparations begin!!

Make sure you check back every day for even more inspiration. 

See you soon!

~~~~~

Thanks for reading. If you like what you see here on Silver Boxes, I'd love it if you would become a follower on Google Friend Connect, subscribe by email (sign up on the right sidebar), 
or follow along on FacebookPinterestInstagram, or Twitter
And please leave a comment when you do so I know who my new friends are! :)


Enjoy Your Day!


Tuesday, September 17, 2013

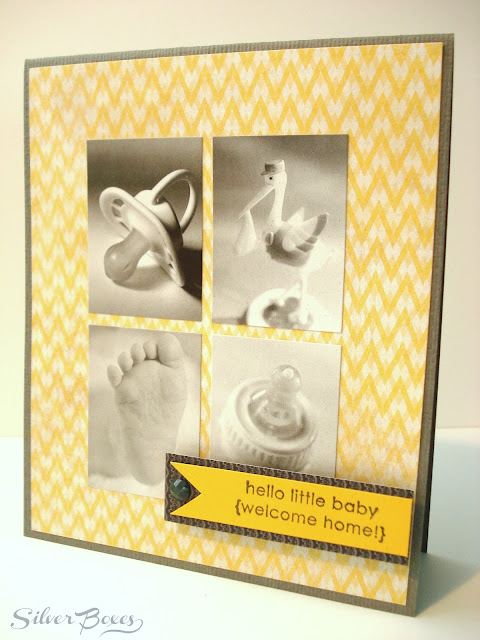
Yellow & Grey Baby Cards


Okay guys. 

I haven't forgotten about you. But you know what season is coming up? 

Craft Fair Season!

I've been spending every. spare. moment. getting cards & other crafts ready for my first one at the beginning of October.


I've got a nice batch of goodies going already & I'll be sure to share some photos with you soon.


As you may or may not know I make a lot of baby cards for a friend of mine who owns a baby boutique.

These yellow & grey series are some of the most recent ones I've made for her.


Those photos are actually stickers that all came on a sheet together & turned out to become some of the sweetest, most simple cards!


I hope your having a great week!


Thanks for reading. If you like what you see here on Silver Boxes, I'd love it if you would become a follower on Google Friend Connect, subscribe by email (sign up on the right sidebar), 
or follow along on FacebookPinterestInstagram, or Twitter
And please leave a comment when you do so I know who my new friends are! :)


Enjoy your day!


Friday, September 06, 2013

Marjolaine Birthday Cards


School's back in session & I'm now prepping for the fall & Christmas craft fair season.

Here's a series of cards I've created for my booth.

All of them are made almost entirely of product from Basic Grey's Marjolaine line, with the exception of the card stock & the birthday stickers.

I hope these can bring some inspiration for you to mix up some patterns & whip up some handmade cards too!


Have a happy weekend!

~~~

Thanks for reading. If you like what you see here on Silver Boxes, I'd love it if you would become a follower on Google Friend Connect, subscribe by email (sign up on the right sidebar), 
or follow along on FacebookPinterestInstagram, or Twitter
And please leave a comment when you do so I know who my new friends are! :)


Enjoy your day!


Wednesday, July 31, 2013

Chevron Ribbon Card

When's the last time you had a birthday party for yourself? Why do we just reserve them for the kids only?
I'm thinking that adults have far too few birthday parties. Shouldn't we celebrate each other's lives & achievements as well? 
I say yes! 

If I was to throw myself a birthday party, I think I would have a chevron theme like this chevron ribbon card.


It's full of my favourite things... all my favourite colours, resin flowers, crochet flowers, & of course CHEVRON!


Products used:
  • Cardstock - Michael's
  • Chevron ribbon - American Crafts
  • Resin flowers - Michael's
  • Crochet flowers - Michael's
  • Happy birthday sticker - American Crafts
  • Corner punch - EK Success

Thanks for reading. If you like what you see here on Silver Boxes, I'd love it if you would become a follower on Google Friend Connect, subscribe by email (sign up on the right sidebar), 
or follow along on FacebookPinterestInstagram, or Twitter
And please leave a comment when you do so I know who my new friends are! :)


Enjoy your day!


Thursday, July 25, 2013

Easy Robot Card

Need a birthday card for a special birthday boy? 

I've got something fun & simple for you!


1) Start with some kraft cardstock, cut to card sizing
2) Mat with a plaid patterned paper
3) Cut out a robot from patterned paper & mount with foam dots
4) Apply a sentiment sticker

Done!


Supplies used:
  • Kraft cardstock - Michael's
  • Patterned paper - Cosmo Cricket (Plaid) & Kaisercraft (Robot)
  • Sentiment sticker - Karen Foster Designs

Thanks for reading. If you like what you see here on Silver Boxes, I'd love it if you would become a follower on Google Friend Connect, subscribe by email (sign up on the right sidebar), 
or follow along on FacebookPinterestInstagram, or Twitter
And please leave a comment when you do so I know who my new friends are! :)


Enjoy your day!


Wednesday, July 17, 2013

Tag Birthday Card

Hi everyone!

I hope your week is going well & you're enjoying your summer.
The kids started swimming lessons earlier this week, so we've been spending the morning at the pool everyday & will be until the end of next week. The weather has been beautiful & I'm enjoying the sun while I watch them swim.

Today's card was created with a variety of patterned papers from My Mind's Eye. I really like purchasing the 6x6 pads - they're perfect for card making! The patterns are a bit smaller & when I can find them at Winners & Homesense, the price cannot be beat!

I started by using strips of paper that had a simple notch cut into the bottom.


I used the alphabet stickers for a sentiment &
 added a bit more detail with some brads & baker's twine.


A trendy, colorful birthday card!

Products used:


  • Cardstock - Michael's 
  • Patterned Papers - My Mind's Eye
  • Foam Letters - American Crafts
  • Mini Letters - Making Memories
  • Brads - American crafts (Large) & Basic Grey (Small)
  • Baker's Twine - My Mind's Eye

Thanks for reading. If you like what you see here on Silver Boxes, I'd love it if you would become a follower on Google Friend Connect, subscribe by email (sign up on the right sidebar), 
or follow along on FacebookPinterestInstagram, or Twitter
And please leave a comment when you do so I know who my new friends are! :)


Enjoy your day!


Wednesday, July 03, 2013

This Way To Birthday Fun!

Well, after a little blogging break to get settled into summer, I'm back!

Taking a break always usually helps me think of some creative posts to share with you & get fired up for my next project. Breaks are good. They are needed. But it's good to be back.

What have you been up to so far this summer?

~~~

Here's a fun birthday card that perfectly suited to a summer birthday party!


Monday, June 17, 2013

Doily Birthday Card {Echo Park}


In the last several days, it's been raining cats & dogs here in Saskatoon. Today was the first day of sunshine since last week. Because of all the rain, we've been stuck inside. We've been doing alot of reading, playing games, watching movies, & doing crafts. I even got some scrapbooking in, which I haven't done in a long time. 

Sunshiny summer days call for bright, summery colours! 

This was a very fast card, made with a bunch of paper scraps.

Wednesday, May 29, 2013

Polka Dot Baby Card


Polka dots are all the rage, have you noticed? Geometric patterns are my fav so I'm loving the polka dots, stripes, & chevron that I'm seeing everywhere. 

I also enjoy bringing trends into my paper crafts as well...


Enter the polka dot baby card! A fun way to mix & match patterns too!

Wednesday, May 15, 2013

Button Baby Card


Is there anything more sweet than a new baby? I think God makes them so adorable so that we want to be around them & take care of them. :)

And because babies are so cute, we want the things around them & the things that celebrate them to be cute too!

Blogging tips