Wednesday, November 07, 2012

Christmas Place Cards

  
  Well, today is the day. I've been working very hard on Christmas crafts all month to get ready for today's craft fair. Of the things I've been preparing, one of them is Christmas place cards. 

  Place cards are a great thing to have on hand for your formal Christmas dinner. They're also great for buffets so you can label each dish.

Here is a set that I made a couple Christmases ago for my mom. She had started a bird theme with her Christmas decor & wanted some place cards to co-ordinate at the Christmas table. 


Sadly, they took quite awhile to make - lots of tiny pieces. I would have loved to make more of those for the craft fair, but just didn't have the time. Maybe next year.

Here are some simple ones I created for the craft fair.


I added a little bling to the gifts as well as to the snowflakes below...


'Cuz everyone loves a little bling, right? 

I'll be sure & let you know how things went today. 
I hope you're having fun getting ready for the holidays. :)

Thanks for reading. If you like what you see here on Silver Boxes, I'd love it if you would become a follower on Google Friend Connect, subscribe by email (sign up on the right sidebar), 
or follow along on FacebookPinterest, or Twitter
And please leave a comment when you do so I know who my new friends are! :)


Enjoy your day!


Monday, November 05, 2012

Christmas Tags Using The Cricut

  What a weekend! I was busy in my craft room almost the whole time getting things finished up for this week's craft fair. I think I got everything ready that I wanted to - or at least a little bit of everything. This will kind of be a testing ground for me to see what quantities I will need in the future, providing I decide to participate again. I'm sure it will be great & I will want to do it again!

  Here's one of the goodies I created...

Christmas Gift Tags


I used my Cricut for these babies & was able to make a lot relatively quickly.

1. Cut out tags from cardstock 
(I used the Birthday Bash cartridge)
2. Cut a square for a background from patterned paper or sheet music 
(I used George & Basic Shapes cartridge)
3. Cut embellishment of your choice from cardstock
(Holly is from Winter Wonderland cartridge & Star is from George & Basic Shapes)


4. Fancy up your embellishment with some glitter 
(I used Stickles).  Let Dry! :)
5. Tie a length of twine or ribbon to your tag
6. You're done!


Make a large batch of them to go with your Christmas decor & use them in your Christmas wrapping this season.


 I hope you stay tuned for a lot more Christmas wrapping ideas, crafts, cards, & recipes all the way up until Christmas!

~~~~~


Thanks for reading. If you like what you see here on Silver Boxes, I'd love it if you would become a follower on Google Friend Connect, subscribe by email (sign up on the right sidebar), 
or follow along on FacebookPinterest, or Twitter
And please leave a comment when you do so I know who my new friends are! :)


Enjoy your day!


This project was featured on:

Tuesday To Do Party Inside BruCrew Life It's Overflowing

Friday, November 02, 2012

How To Make Tissue Paper Flowers


Have you ever been in a card store, buying wrapping paper for a gift? You may grab a bow that goes with the gift wrap & be struck by how expensive those things are! Did you know you can make something similar out of tissue paper for just pennies? 

Yup.

Here's how...

1. Start with one sheet of tissue paper. 
2. Fold it to approximately the size you want your flower. 
3. Cut a flower shape out of the folded tissue paper.
4 & 5. You can even layer different colours together.
6. To add an adhesive square to the back, simply cut a square from an adhesive backed foam sheet or paper.


7. Staple it, adhesive side OUT, to the flower.
8. Flip over. Starting with the top layer or two of tissue, gently pinch the paper together to create petals. Keep going until most of the layers are pinched or until you get a look that you like.
9. Peel off protective sheet from the adhesive & stick to your gift. 

So easy!

Make them as large or small as you want too! 


Here, I made an extra large one for this gift bag.


Thanks for reading. If you like what you see here on Silver Boxes, I'd love it if you would become a follower on Google Friend Connect, subscribe by email (sign up on the right sidebar), 
or follow along on FacebookPinterest, or Twitter
And please leave a comment when you do so I know who my new friends are! :)


Enjoy your day!


This project was featured on:

Inside BruCrew Life

Wednesday, October 31, 2012

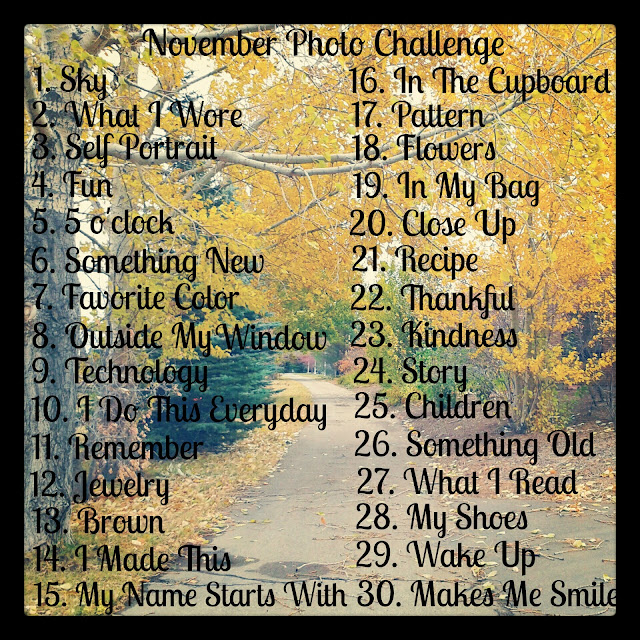
November Photo Challenge

After doing last month's photo challenge & enjoying it so much, I went on the search for a challenge for November.

But... I couldn't find one that I really liked, so I made one of my own!


I'll be using Instagram for my photos if you'd like to follow along (Search the name StephRichy on Instagram). You can leave me a comment with your Instagram name & we can do this challenge together! 

I'll also be posting my daily photo on my Facebook page. Come on over!


Thanks for reading. If you like what you see here on Silver Boxes, I'd love it if you would become a follower on Google Friend Connect, subscribe by email (sign up on the right sidebar), 
or follow along on FacebookPinterest, or Twitter
And please leave a comment when you do so I know who my new friends are! :)


Let's rock this November!


October Wrap-Up

  What a whirl wind this month has been! At the beginning of the month, I joined a photo-a-day challenge with some friends. It was so fun! I used my phone camera & I edited with instagram (follow me at stephrichy if you'd like) to make things easy. If you've been following me on Facebook, you've likely already seen some of them.

  Here's this month's photo-a-day recap:


  1. Fall
  2. Leaves
  3. Bubbles
  4. Stairs
  5. Mirror
  6. Straw
  7. Water
  8. Peek-a-boo
  9. Something Purple
  10. A Light In The Dark
  11. Laughter
  12. Candy
  13. #13
  14. Hallway
  15. Pumpkins
  16. Something Black
  17. A Stranger
  18. Stars
  19. Doorway
  20. Signs
  21. I Ate This
  22. I Am Here
  23. Shoot From The Hip
  24. Decorations
  25. Makeup
  26. Moon
  27. Scar
  28. Something That Scares Me
  29. Panic
  30. Broken
  31. Spooky

I really enjoyed getting creative & brushing off some of my old photography skills. 

On to November (which I'll be posting about later today)!

Enjoy your day!

Blogging tips