Monday, January 16, 2012

Industrial Style Letter Tutorial

  Last week, when I posted about my grey & yellow vignette, I gave you a peek at the wooden letter that I recently finished. Today, I'm going to show you how I did it!


Here's what I started with:


~Wooden Letter
~Aluminum Foil
~Craft Knife
~Mod Podge
~Foam Brushes
~Black Craft Paint (not shown)

1) Trace & cut out the letter shape as well as strips for the sides on the letter.


2) Mod Podge the aluminum foil edges first. Shiny side down. Be careful to smooth out any bubbles.


3) Now, Mod Podge the front & back. Again, shiny side down. Let dry.


4) Once it's dry, apply a thin coat of Mod Podge over the whole thing. Let dry.


5) Working in small sections, brush on a small amount of black craft paint. Wipe off with an old rag or paper towel. Work quickly because the paint dries fast! A bit of paint with stick in the crinkles & corners, giving it an industrial look. Let dry.


Incorporate it into your decor & enjoy!

On a completely different subject, what do you think of the new chevron background on Silver Boxes? 
I'm likin' it. I'm trying to learn some new blogging skills so I can change up the look a bit. 
You may see more changes soon. Thanks for your patience as I learn.  :)

Thanks so much for stopping by. Make it a great Monday!

Friday, January 13, 2012

Grey & Yellow Vignette

  I refashioned a little nook in our front entry way today. Grey & yellow have been calling my name lately, so I decided to see what I could come up with in those colours. 

  After "shopping" around our house, this is what I came up with. 

I love the name of that middle book! I got it for Christmas, but haven't had a chance to read it yet.

  I had some old embroidery hoops in my craft bin as well as some fabric squares in grey & yellow. The two combined = cuteness! (Is that a word? Well, it is now.) :) 
  I propped them up in the back (one leaning on a little stand & the other in front of it), stacked some grey & yellow books to the side, added a few other silver items & it all came together rather quickly. 


Some grey rocks added in the bowl bring a bit of nature to the vignette.


Vignettes can be a challenge. But when you remember a few guidelines, they can make it easier. 

  • Different heights. If everything is the same or similar in height, it won't work. Bring in stacks of books or boxes & top them with another item of interest. Think of a city skyline - all the buildings are different heights & it draws the eye to different focal points. Your vignette is like a mini skyline.

  • Repetition. In the vignette I've showed you here, I have repetition in the colours - grey & yellow - as well as the circles in the embroidery hoops & the silver bowl. An added bonus - my circular mirror echos the circle theme!

  • Odd numbers. It's visually pleasing to have odd numbers in design elements. If you'll notice that I paired 3 yellow items & 5 grey/silver items. I didn't do that on purpose, but it works.


Click here to see the post on this table's makeover

  The silver "R" in this grouping is a project that I just finished. I'll be featuring a tutorial on how I made it next week. Be sure to come back for that! 

  I'm also on the hunt for something to put in my empty lantern for these winter months. For Christmas, I had it filled with vintage Christmas ornaments that I scored on my last thrifting trip.

  Well, I'm off to clean up my craft table so I can start my next project! Thanks for reading!

Enjoy your day!

Wednesday, January 11, 2012

Banana Bran Muffins with Apricot Butter

    Even though I haven't done it much, I love the idea of having company over for brunch instead of always for dinner. It definitely shakes up the menu options! These muffins would be a perfect addition to a yummy brunch menu. The Apricot Butter makes it a bit more special.


Banana Bran Muffins with Apricot Butter
makes 12 muffins

1  2/3 cups all-purpose flour
1 tsp. baking powder
1 tsp. baking soda
1/2 cup butter, softened
2/3 cup natural bran
1 egg
2/3 cup mashed banana
1/2 cup plain yogurt
1/2 cup packed brown sugar
1 Tbsp. molasses

1) Preheat oven to 375ยบ.

2) In a large bowl, mix together flour, baking powder, & baking soda. Cut in butter until mixture is crumbly. Stir in bran.

3) In small bowl combine all remaining ingredients. 

4) Add all at once to flour mixture. Stir just until combined.

5) Divide batter evenly among 12 medium greased muffin cups. Bake for 20-25 minutes. 
    Serve warm with Apricot Butter. 

Apricot Butter
makes 1 cup

Cream together 1/2 cup softened butter & 1/2 cup apricot jam. 


What are some of your favourite brunch recipes? Don't be shy, let me know! :)

Enjoy your day!

Monday, January 09, 2012

Organizing Our Big Road Trip

  It's January. Christmas is done & the days can be dreary. When our regular to-do list is complete, we fill our free time with crafts & cute projects to bring some cheer to the grey winter. One other thing people start to do at this time of year is to start planning their summer vacation.

  We are no different.

  In fact, we started planning this summer's vacation a year & a half ago. It's been a long time coming, it seems. Now that it's 2012, we can start saying "this year" instead of "next year".  How exciting!

  Yes, we're going to Disneyland.


  Not only are we going to Disneyland, we're driving to Disneyland. Approximately 2,800 kilometres (that's 1,740 miles for my American readers).

  It will be a road trip of monumental proportions. I'm absolutely pumped. I love road trips! But this is the longest road trip we've ever attempted, so it requires some major organizing & planning.

  We've been reading up on Disney vacations & tips. I'm starting to plan early & have started to make a packing list for each person in our family.


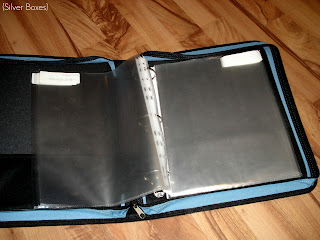
  I've also started compiling a trip binder. 

  The trip binder is an idea I got from my sister-in-law, Carrie-Lynn, when they drove to Disney a couple of summers ago.

  It includes maps, itineraries, pamphlets, hotel information, etc. Any paper work involving the trip goes into the binder. 

  It's a brilliant idea, really. 

1) Choose a zippered binder, so that your papers don't slip out & get lost.


2) Fill it with plastic sleeves. One for each day of the trip, plus a hand full of extras.


3) Print off your day-by-day directions from map quest or google maps, your trip itinerary with each night's hotel information, including confirmation numbers, restaurant possibilities, sights you want to see, etc. & include them all in the binder.


4) When you're on your trip & pick up small mementos & pamphlets or tickets you want to keep, stash them into the binder & it's all in one place when you get home. 

  I'm filling up the binder bit by bit, as we reserve our hotels & get things booked. I've also started a countdown on our computer so we know how many sleeps are left until we leave! Ya, we're just a bit excited. :)

When do you start planning your summer holiday? Are you headed somewhere special this year?

Enjoy your day!

Friday, January 06, 2012

My Not-Yet-Famous Guacamole

  I don't know about you, but our family enjoys Mexican food year-round. Guacamole is one of our all-time favourite things to eat. My husband loves it so much that he keeps telling me I need to package & sell it! Well, instead, I'm going to share my not-yet-famous recipe with you. This is totally my own creation.


Steph's Not-Yet-Famous Guacamole

3 peeled, mashed ripe avocados 
2 Tbsp. chopped fresh cilantro (or 1 tbsp dried parsley)
2 Tbsp. fresh lime juice (juice of 2 small limes)
1 1/2 tsp. hot sauce
1/2 tsp. salt
1/2 tsp. pepper
1/2 tsp. garlic powder

Mix it all together. It's best if you can let it sit for a couple of hours to let the flavours mingle, but you can serve immediately too. 

Serve with chips, veggies, or nachos.

We like our guacamole chunky so I don't over mash the avocados, but if like yours smooth, you could puree it. 

Tip: If you buy hard avocados & need them to ripen quickly, put them in a paper bag on your kitchen counter & they will ripen in half the time!


~~~

What kind of food do you eat year-round? Any family favourites that never get old? Please share!

Enjoy your day!
Blogging tips