Monday, October 31, 2011

Fall Festival

  In the last few weeks of blogging, I've been talking about the Fall Festival that our church was planning. Sunday was the big day. My friend, MJ, & I had set up our booth on Friday afternoon. I was full of anticipation to see what people's reaction would be.

  We started the day out getting our kids all costumed up for our church's Candy Carnival. Our little girl was a hula girl & our little boy was a pirate. I got the hula stuff at Dollarama. Most of the pirate costume came from thrift stores (ladies slouchy boots, too-big black pants, & a ladies ruffled blouse). We got the pirate hat, stick-on moustache, eye patch & sword from Dollarama. The parrot came from Wal-mart. The coat is mine. :)


  The kids partied in the gym while we were having church. After church, everyone headed into the gym for a yummy meal of fried chicken, rolls, & salads with home made pies for dessert. Delish!

  There was live entertainment, fun fall decorations, caramel apples, carnival games, popcorn, sno cones, tons of candy for the kids, & of course the booths which were run by different people in our church. 

  Our booth was well received & MJ & I both sold about half of what we brought. I'd call that pretty successful. 

The goodies in our booth. Top row: my offerings. Bottom row: MJ's fabulous creations.
  
  I didn't get a lot of photos as we were kept pretty busy with our customers, but here's a few:


A great time was had by all! I, for one, hope it becomes an annual event. A huge thank you to everyone who helped pull it off!!

Enjoy your Monday!
Linkin' Up:


Friday, October 28, 2011

Before & After Home Tour (Part 5) : The Little Girl's Room

  I love how this blog inspires me to get more of my projects done so I can tell you about them. It's wonderful motivation!

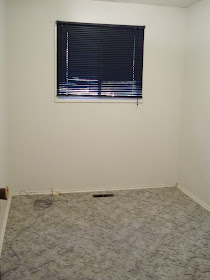
  My little princess & I cleaned up her room & hung some new pictures this week. She says, "My room is awesome!" :) I quickly took some pictures to share with you.

  It went from bo-ring to bright & cheery.


  This was actually one of the better rooms in our home when we moved in. It was just bland. We removed the carpet & old navy blind.


  We painted it a pretty pink for our princess-in-training. She wanted a pink & purple bedroom. When I heard that I cringed. I was imagining a hideous, neon shaded room. Fortunately, things didn't turn out that way. Lots of white with only small splashes of purple helped pull this off.


And because we all love a before & after:


  On another note, this weekend is the Fall Festival I've been working so hard to prepare for. If you'd like to see some of the goodies I'll be selling at my booth this weekend, click here, here, here, & here. I'll let you know how things went on Monday. I hope you'll join me.

Enjoy your day!
Linkin' Up:

Thursday, October 27, 2011

Paper Box Tutorial

  Last week, I posted pictures of the paper boxes I've been making for the fall festival where I'll be having a booth. The boxes are for housing handmade cards.


  I had a number of requests for a tutorial on how to make them, so here we go!

  Just a fair warning: this post is very photo heavy so you can see the instructions rather than just reading them.

Supplies:
2 sheets of 12x12 cardstock
1 or 2 sheets of patterned paper (or large scraps work too)
Adhesive
Paper scorer
Paper cuter
Ruler

  (Remember those old stories on record that you used to listen to? I feel like saying, "You will know it is time to turn the page when you hear the chimes ring like this... brrrriiiiing! Let's begin now.")

1) Cut one of the sheets of cardstock down to 10x12. Discard small strip.


2) Measure & score according to the following diagram:


3) Now cut according to this diagram:


This is what it should look like after you've cut:


4) Now fold all the scored lines.


5) Fold in small squares & start adhering the box together

These squares will be on the inside of the box.


There. You're done with the bottom of the box for now.

Now the lid.

1) Start with your second piece of 12x12 cardstock. Trim it down to 6 & 1/8 x 10. You need that extra 1/8th of an inch because if you don't have it the lid won't fit over the bottom.


2) Measure & score as shown below.


3) Cut the sides according to this diagram.


It should look like this:


4) Fold the scored lines & start putting it together as you did the bottom.


Here's the box. Now it's time to decorate!


  I keep it simple by adding some co-ordinating paper to the top & the bottom. You really could do whatever you wanted though. In the past, I've added tags, brads, ribbon, buttons, & rub ons. You can do as much or as little as you want. 


The finished product!


  If you are still reading, please let me say thank you & congratulations! Once you make a few of these, it will be old hat & you'll be able to mass produce at a whim.

  If you have questions please let me know & I'll do my best to answer. Thanks for sticking with me through all those photos & measurements!

Enjoy your day!
Linkin' Up:

Wednesday, October 26, 2011

Pineapple Rhubarb Jam

  Every summer, I chop & freeze vast amounts of rhubarb in preparation for my annual batch of Pineapple Rhubarb Jam. (We have 5 huge rhubarb plants in our back yard.) I blogged about the rhubarb back in August, thinking I would get to the jam pretty soon thereafter. I was wrong.

  We've had such a beautiful, warm fall here in Saskatchewan (and I, for one, am not complaining) that I kept putting off the jam making for a cooler day. The cooler days just didn't come until October! Last week, I finally got it made. It's done for another year.

  I love sharing jars of this with my family & friends & of course enjoying it throughout the year. Actually, we just finished the last jar of last year's batch the week I made this. Good timing. :)

  I present to you the jam recipe that has been adapted from my husband's grandma's recipe.

  I started out with 56(!) cups of rhubarb. Fifty. Six.

  Thankfully, after rhubarb has been frozen & then thawed, it reduces it's volume by about half. Okay, now I was working with only 28 cups. So, I multiplied this recipe x5.


Pineapple Rhubarb Jam

5 cups rhubarb (if you have frozen rhubarb that you have thawed, make sure you drain it. If you don't, you'll get runny jam)
1 cup crushed pineapple
2 1/2 cups white sugar
1 pkg. strawberry jello

Mix rhubarb & sugar, bring to a boil, stirring until sugar dissolves. Boil for about 10 minutes. Stir often so it doesn't burn.

While it's boiling, start preparing your jars. With lids removed, soak the jars, lids, & seals in hot tap water in the sink. Leave them in the hot water until you're ready to use them.

Add Pineapple & boil for another 10 minutes. Stir often so it doesn't burn.

Remove from heat. Add jello powder & mix well until dissolved.

Pour jam into jars & seal. 

Tips: I fill my jars almost to the top, then wipe around the lip of the jar to get any spilled drops. Apply the lid. Cool on the counter until the jars have "popped". You will hear the seals popping as they seal. Test the tops by pushing down on them, if they don't move, they are sealed. If they pop down & then up again, you will have to store your jam in the fridge or reseal. To help with the sealing process, always use new seals. 

  Thanks to those of you who joined me on the jam journey on Facebook last week. It made it fun for me to interact with you while I was cooking & preserving.

Enjoy your day!
Linkin' Up:


Tuesday, October 25, 2011

Christmas Cards

  You know last week I was talking about blasting my Christmas music & creating with my little girl? Well, I'm pleased to say I got to do just that this weekend. We were singing carols & crafting our hearts out. My little girl was happy with just a bunch of paper & punches. She punched flowers & shapes to her heart's content.

  Here's what I created:


  I'm almost ready for my fall festival booth. Just a few more birthday cards to make. I'm looking forward to it so much!

  What have you been creating lately?

Enjoy your day!
Linkin' Up:

Monday, October 24, 2011

Thrifty Treasures

  On Friday, I was so blessed to be able to spend the day with my friend, Sarah. After hearing about my day thrifting this summer, she has been excited to go treasure hunting with me. I was her guide for the day. No pressure, right? :)

  We started off at the local thrift stores & we each scored some goodies. I almost bought this coffee table, but it was too long for our space. It would be so lovely all redone.


  Check out this FAB-U-LOUS glass set Sarah snagged: 

Yes, those are silver dots on the glasses. Perfection!

  Yup, she's a quick learner. 

  After getting our feet wet, we moved on to the antique stores. Here are some gems that we loved, but didn't buy. 

Large wooden spools
Vintage looking (but new!) table & chair sets
Row upon row of 3-footed tea cups
A well set from an old soda shoppe.
Most of the wells even had the original labels on them. 

My dear friend, Sarah, in a fabulous blue chair that we found.
Neat sewing chair...
The seat opened up for storage!
Look at this beauty!
Massive dictionary
  Days like these are a feast for the eyes. It's so much fun.

  Here's what I came home with:

  1. Milk glass - 3 pieces total. Goblet, candy dish, & bowl.
  2. Vintage shot glass that I'll use as a candle holder since I don't drink.
  3. A bag of vintage Christmas decorations. Don't they look pretty in the milk glass bowl I bought too?
  4. Vintage spools. I have plans to use these to make some Christmas ornaments. 
  5. The poison dart froggy sponge holder. I've been looking for one of these for a long time. When my kids saw it they were kind of scared & had to inform me of it's proper name. I see some glossy spray paint in this chap's future.
  6. Two maps. The major score of the day for me - and they were only .50 each! I've been looking for some maps to start a project that involves a lamp. 

Stay tuned for the above makeovers! (Hopefully) Coming Soon.

Enjoy your day!
Linkin' Up: